The shift to online learning didn't end when campuses reopened. Walk into any university today and you'll find that hybrid and fully online courses are here to stay. Zoom lectures have become a permanent fixture of higher education—which means students need reliable ways to record them.
But here's the thing: recording Zoom lectures is fundamentally different from recording in-person classes. You're not just capturing audio from a professor at the front of a room. You're dealing with screen shares full of slides and demonstrations, chat messages with important links, breakout room discussions, and multiple speakers during Q&A sessions. The technical challenges multiply, and the legal considerations get more complex when everyone can see exactly what recording tools you're using.
This guide focuses specifically on the unique challenges of recording Zoom lectures. We'll cover the tools that work best for online classes, how to handle the permission and visibility issues that come with Zoom recording, and what to do with those recordings once you have them. Whether your professor has disabled participant recording, you need to capture complex screen-shared demonstrations, or you're just trying to keep up with a fast-paced online lecture, this ranking will help you find the right solution.
The answer isn't always the same tool that works best for in-person lectures. Zoom recording requires thinking about video quality, screen capture, file sizes, and whether other participants can see that you're recording. Some of the best AI note-taking apps for general use don't handle Zoom-specific content well, while some tools you've never heard of excel specifically at capturing online meetings.
If you've been struggling to find a good way to record your Zoom lectures—or if you're just starting to explore your options—this comprehensive guide will show you exactly which tools work, which ones to avoid, and how to build a recording workflow that actually helps you learn.
Why Recording Zoom Lectures Is Different
Before we dive into tool rankings, it's important to understand why Zoom recording presents unique challenges that don't exist with in-person lectures.
Unique Challenges of Zoom Recording
When you're in a physical lecture hall, the challenge is simple: capture the audio clearly enough that you can understand it later. But Zoom lectures involve multiple types of content happening simultaneously, and each requires different recording approaches.
Screen sharing is the big one. Professors don't just talk during Zoom lectures—they share slides, demonstrate software, work through problems on digital whiteboards, show videos, and navigate between different applications. That visual content is often more important than the audio. A chemistry professor explaining a reaction mechanism while drawing it on screen needs both the drawing and the explanation captured. Audio-only recording misses half the lecture.
Chat messages matter more than you'd think. Professors and students share links to resources, post clarifications about assignments, ask questions that get answered in text, and provide context that never makes it into the spoken portion of the lecture. If your recording method doesn't capture the chat, you're missing important information.
Breakout rooms create gaps. Many professors use breakout rooms for small group discussions, problem-solving sessions, or collaborative work. The main room recording stops when you're in a breakout room. If you want to capture those discussions—especially if important concepts get explained by TAs or peers—you need a recording method that works in breakout contexts.
Zoom lectures can be quite multi-layered: Recording becomes quite important to not lose any details.
Multiple speakers add complexity. Unlike in-person lectures where it's usually just the professor speaking, Zoom classes often involve more participation. Students unmute to ask questions, guest speakers join, TAs contribute explanations. If you want to know who said what—especially useful for discussion-heavy seminars—you need speaker identification that actually works.
Audio and video quality depends on everyone's internet connection. A professor with spotty WiFi might freeze mid-sentence or have audio dropouts. Students asking questions might sound muffled. Your recording will only be as good as the connection quality during the live session, which means you need tools that handle less-than-perfect input gracefully.
The visibility problem is huge. This is perhaps the biggest difference from in-person recording. In a lecture hall, if you're recording on your laptop, nobody knows unless they're sitting right next to you. In Zoom, many recording methods make themselves very visible to everyone in the call. Meeting bots appear in the participant list. Zoom's built-in recording shows a notification to all participants. This visibility affects both what tools you can use and the social dynamics of the class.
What You Lose Without Proper Recording
The consequences of not recording—or recording poorly—are significant for online classes.
When professors move through slides quickly during screen shares, you can't possibly write down or screenshot everything fast enough. Complex diagrams, detailed tables, code examples, mathematical derivations—they flash by in seconds. Without recording, you're either frantically screenshotting (and missing the verbal explanation) or taking notes (and missing the visual content). Neither works well.
Important URLs shared in chat disappear unless you copy them immediately. Clarifications about assignments, links to supplemental readings, corrections to posted materials—all of this happens in the chat stream and vanishes when the meeting ends unless you've captured it somehow.
Examples worked through on shared screens are often the most valuable part of a lecture. A professor walking through how to debug code, how to analyze a dataset, how to structure an argument—these demonstrations combine visual and verbal learning. Without recording, you're relying on memory of a process you saw once, quickly.
Q&A discussions frequently contain the clearest explanations of confusing concepts. When a student asks exactly the question you had, and the professor explains it in a different way, that moment of clarity is gold. But if you don't record, you're hoping you took good enough notes to capture that explanation accurately.
This is why you need a tool to help you take better notes.
Legal and Ethical Considerations
Recording Zoom lectures involves more complex permission issues than recording in-person classes.
Zoom itself has built-in notifications. When the host starts recording using Zoom's native feature, everyone sees a notification and a red "Recording" indicator stays visible throughout the meeting. This transparency is intentional—Zoom wants all participants to know when they're being recorded.
Third-party tools that use meeting bots create similar visibility. Apps like Otter.ai or Fireflies.ai work by having a bot "join" your Zoom meeting as a participant. Everyone can see "Otter.ai" or "Fireflies Notetaker" in the participant list. This visibility can be awkward in small classes and might prompt professors to ask you to remove the bot.
University policies on recording vary wildly. Some institutions explicitly allow students to record classes for personal study purposes as an accommodation. Others require explicit permission from instructors. Some ban recording entirely except under specific disability accommodations. You need to know your school's policy before choosing a recording method.
The consent question gets complicated in Zoom because you're potentially recording other students when they speak. In some jurisdictions, one-party consent (you're part of the conversation, so you can record it) covers this. In others, you might technically need consent from everyone whose voice gets captured. The legal reality is complex and varies by location.
As we covered in our guide on why you should record lectures, the privacy considerations for recording tools matter significantly. The best approach balances effective learning with respect for privacy and policy.
The practical reality: Most students recording Zoom lectures for personal study purposes don't run into problems, especially in large classes. But understanding the landscape helps you make informed choices about which tools to use and when to ask for explicit permission.
Understanding Your Options: Built-in vs. Third-Party
When it comes to recording Zoom lectures, you have fundamentally different categories of tools, each with distinct trade-offs.
Zoom's Built-in Recording
Zoom includes recording functionality, but access is controlled by the meeting host—usually your professor. There are two types: local recording (saves to your computer) and cloud recording (saves to Zoom's servers).
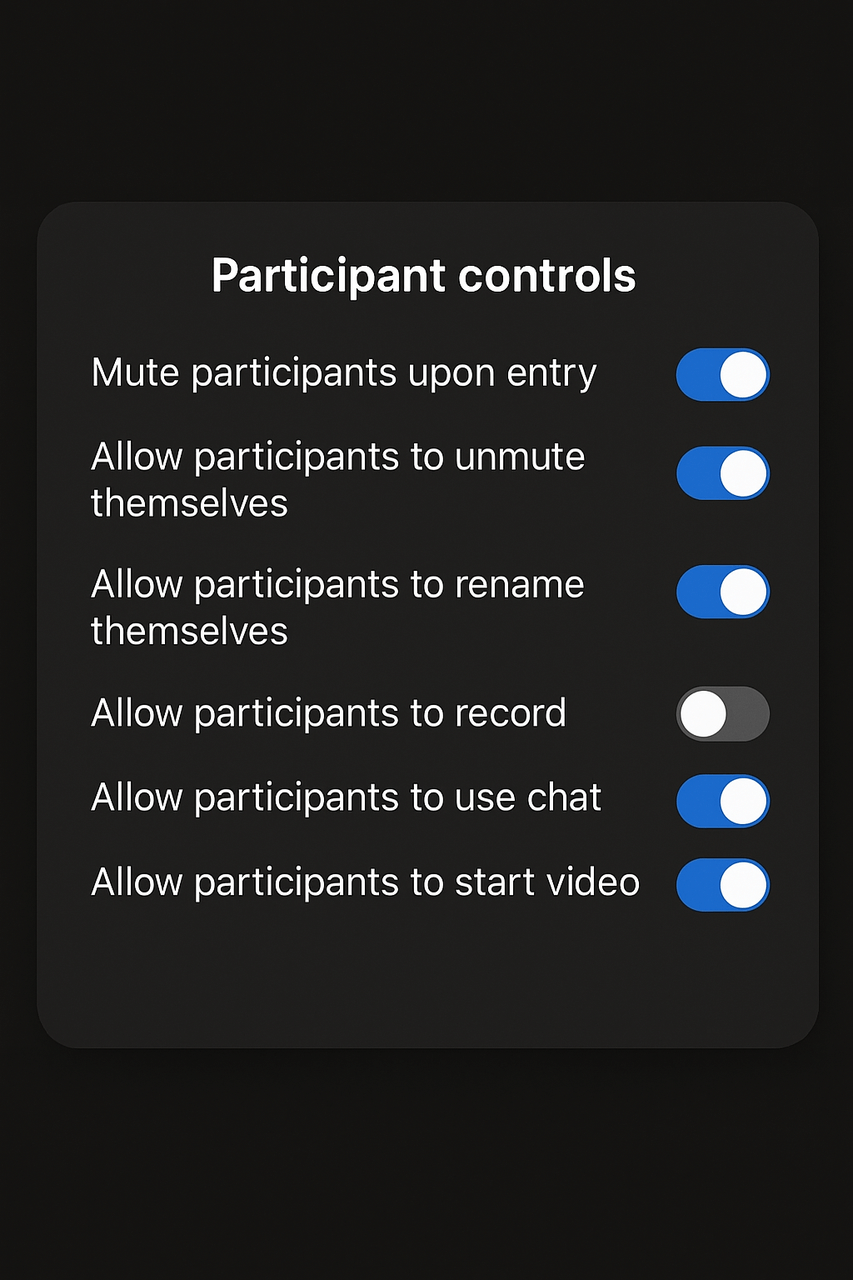
The challenge: In most university Zoom classes, only the host can record. Professors often disable participant recording entirely. Even when participant recording is enabled, you have to rely on the professor not forgetting to enable that setting for each session.
Some professors record lectures themselves and share the recordings later. This seems convenient, but you lose control over the timing. They might not upload recordings promptly. They might forget to record. They might only keep recordings available for a limited time. Relying on someone else's recording is fundamentally different from having your own capture.
But here's the uncomfortable reality: Most professors disable participant recording in Zoom. They have various reasons—concern about recordings being shared publicly, desire to control distribution of their lectures, copyright issues with slides, or simple preference for privacy.
This puts students in a difficult position. The pedagogical value of recording lectures for study purposes is clear (as we covered extensively in our guide on effective study techniques). But the technical controls prevent you from using Zoom's official recording feature.
Third-party tools that work around this restriction—by recording your local screen or audio rather than recording "through Zoom"—exist in a gray area. You're not violating Zoom's settings (the platform doesn't block screen recording), but you might be violating your university's policies depending on how they're written.
Most lectureres disable participant recording, meaning you have to rely on some other tool to do it for you.
When Zoom's native recording does work (because you're hosting a study group, or the professor explicitly enables it for all participants), it's excellent. High quality, captures everything—video, audio, screen shares, chat. But the "when it works" caveat is why this entire guide exists.
Third-Party Recording Apps
Because Zoom's native recording is often unavailable to students, third-party tools fill the gap. These come in several categories:
Meeting bots (Otter.ai, Fireflies.ai) join your Zoom call as a virtual participant and record from inside the meeting. They capture audio and can usually grab chat and transcripts. The major downside: they're visible to everyone. The bot appears in the participant list, which can be awkward or might violate professor preferences.
Screen recording software (OBS Studio, built-in OS recorders) captures whatever is displayed on your screen. You join the Zoom call normally, then record everything you see and hear on your computer. This is invisible to other participants—they have no idea you're recording. The downside: you're recording your entire screen activity, which creates large video files and requires more technical setup.
Browser-based tools (Notigo, Tactiq) work within your web browser to capture or transcribe content. These typically focus on audio and transcription rather than video capture. They're often invisible to other participants and require minimal setup, but might not capture visual content as comprehensively.
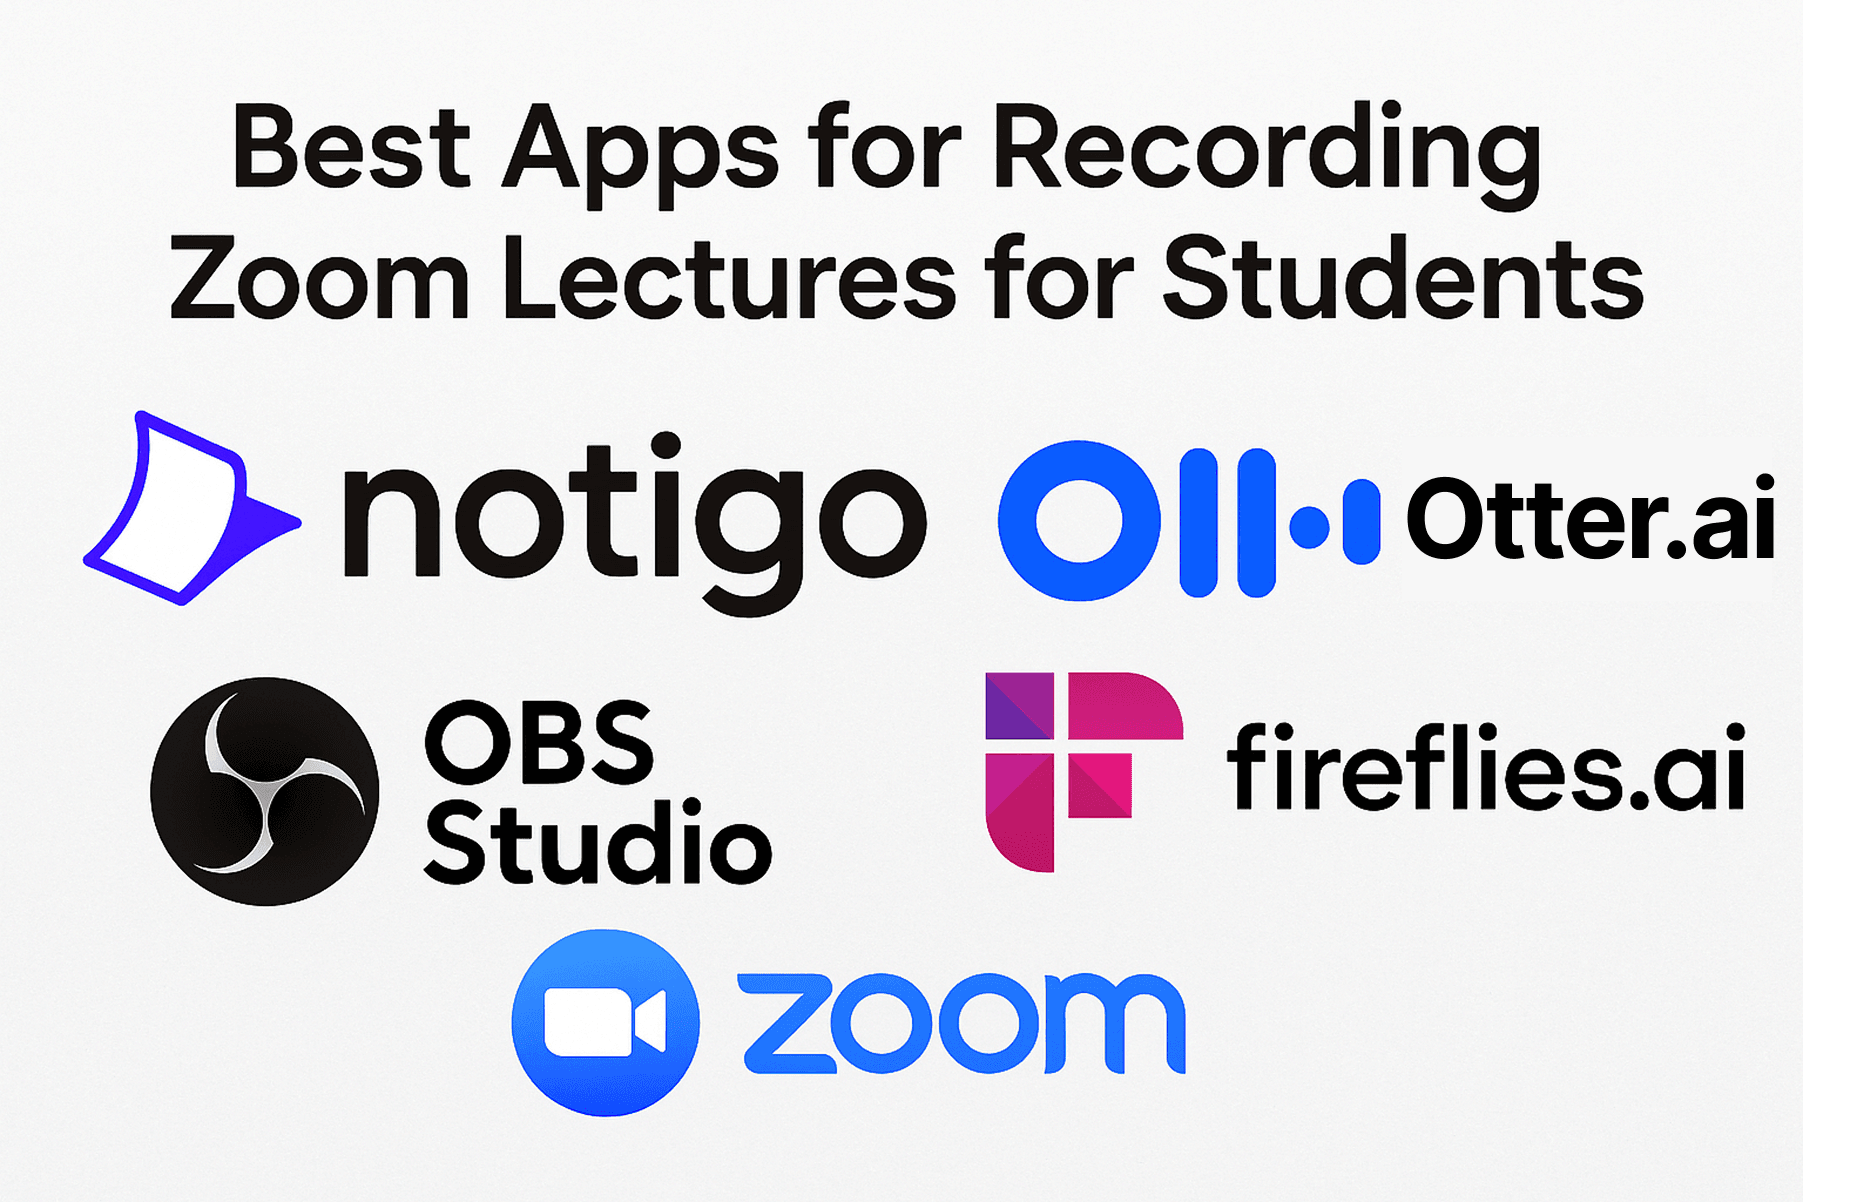
The Rankings
#1: Notigo - Best for Students Who Want Smart Notes, Not Just Recordings
Notigo: The AI notepad that's designed for students, whether in Zoom lectures or lecture
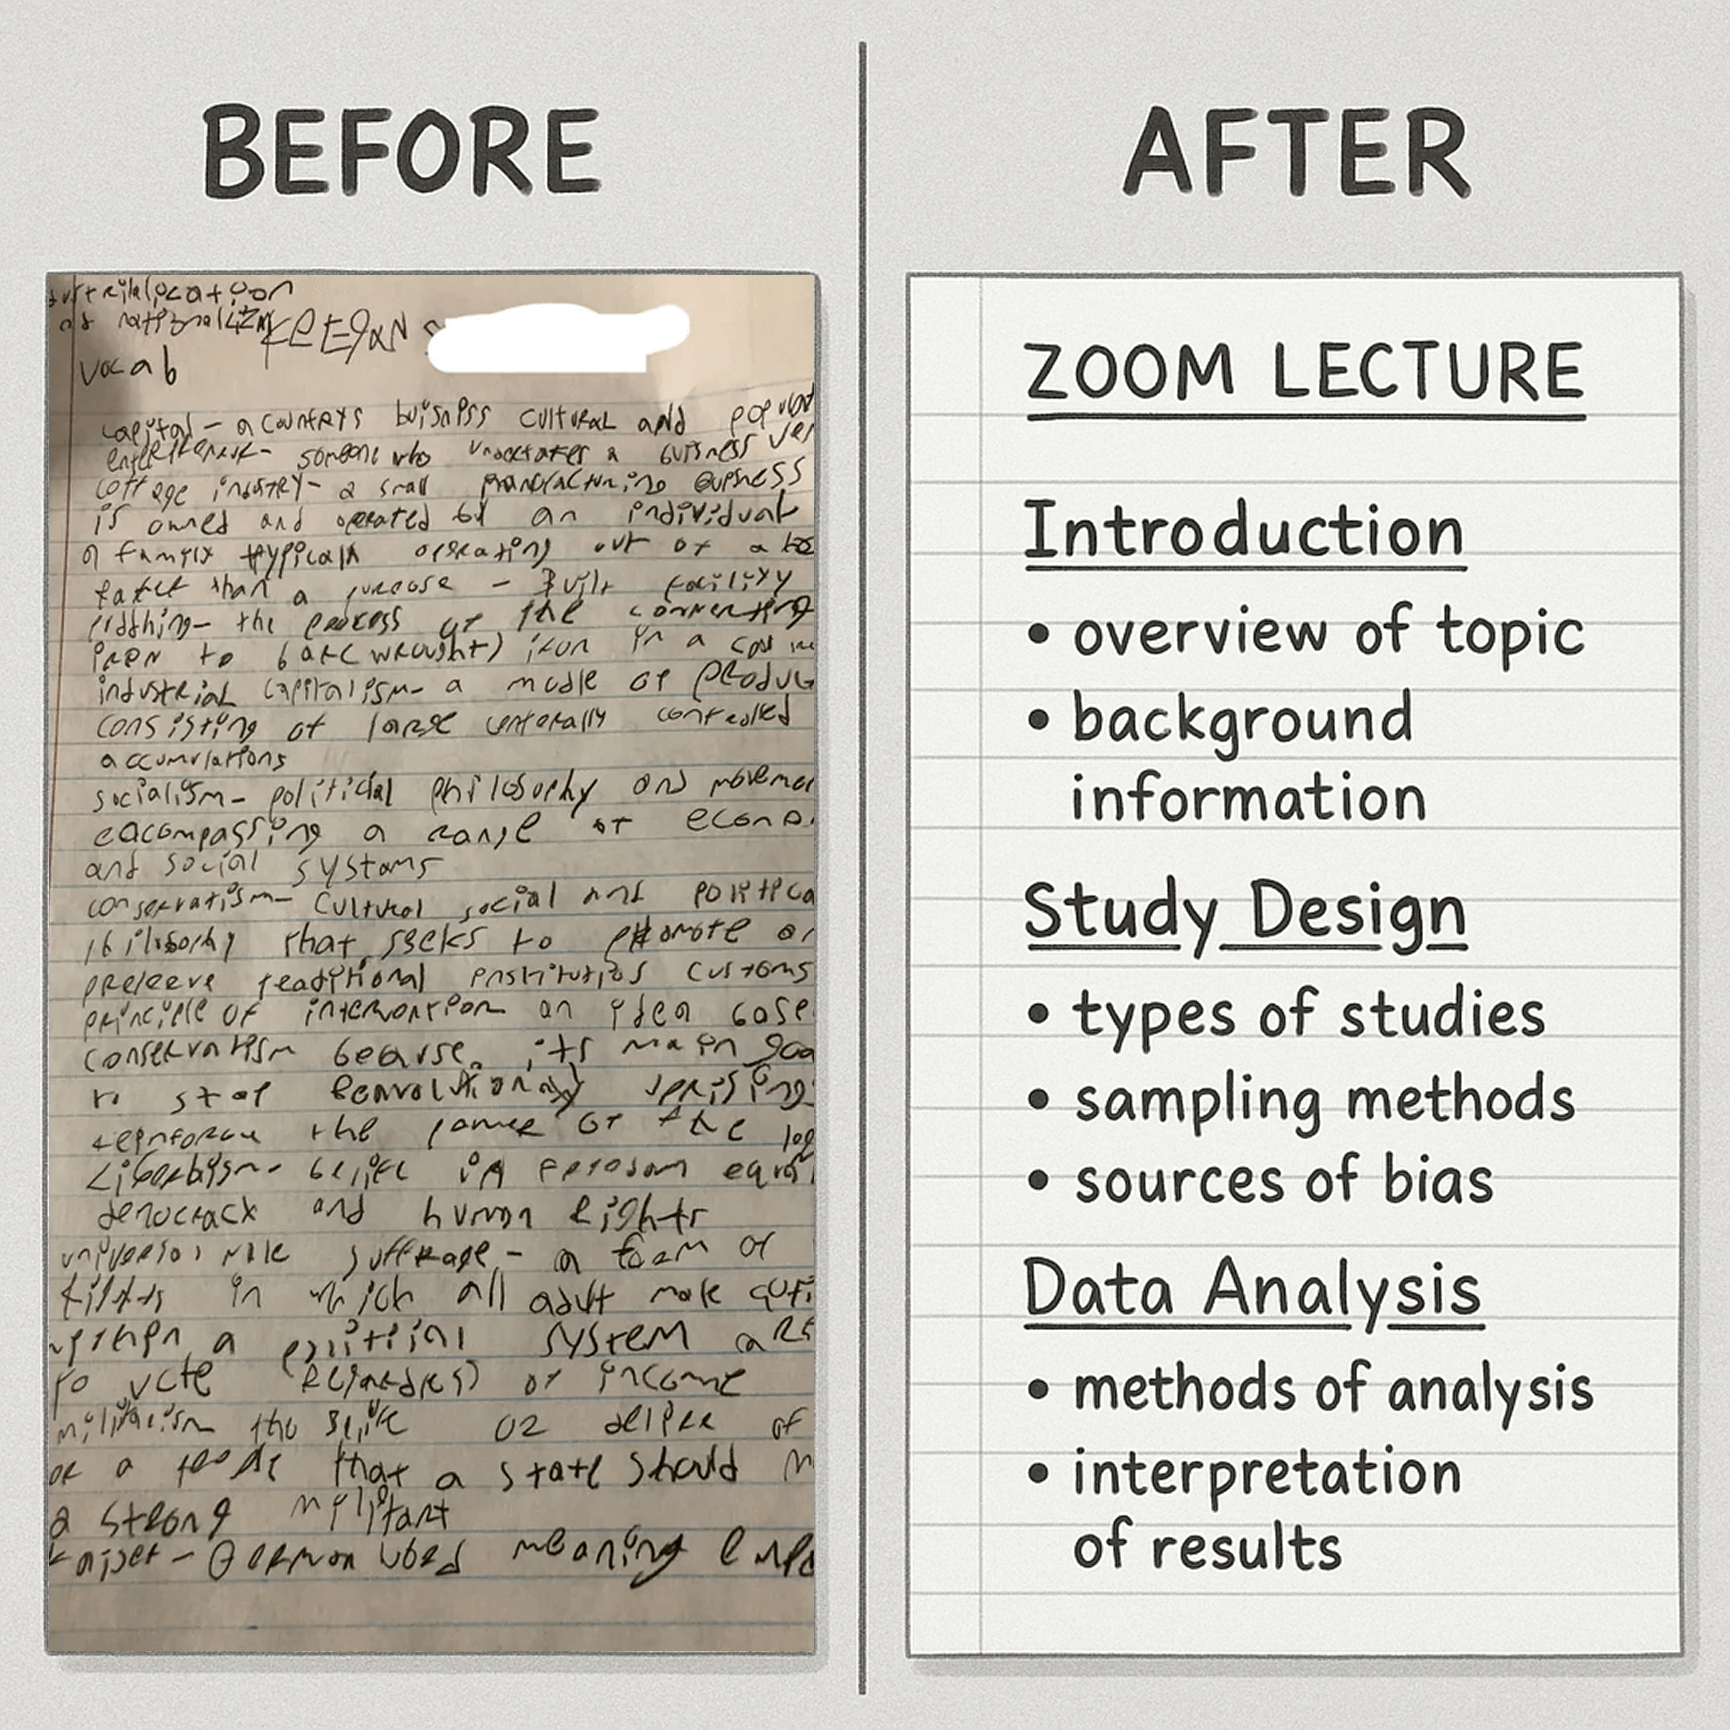
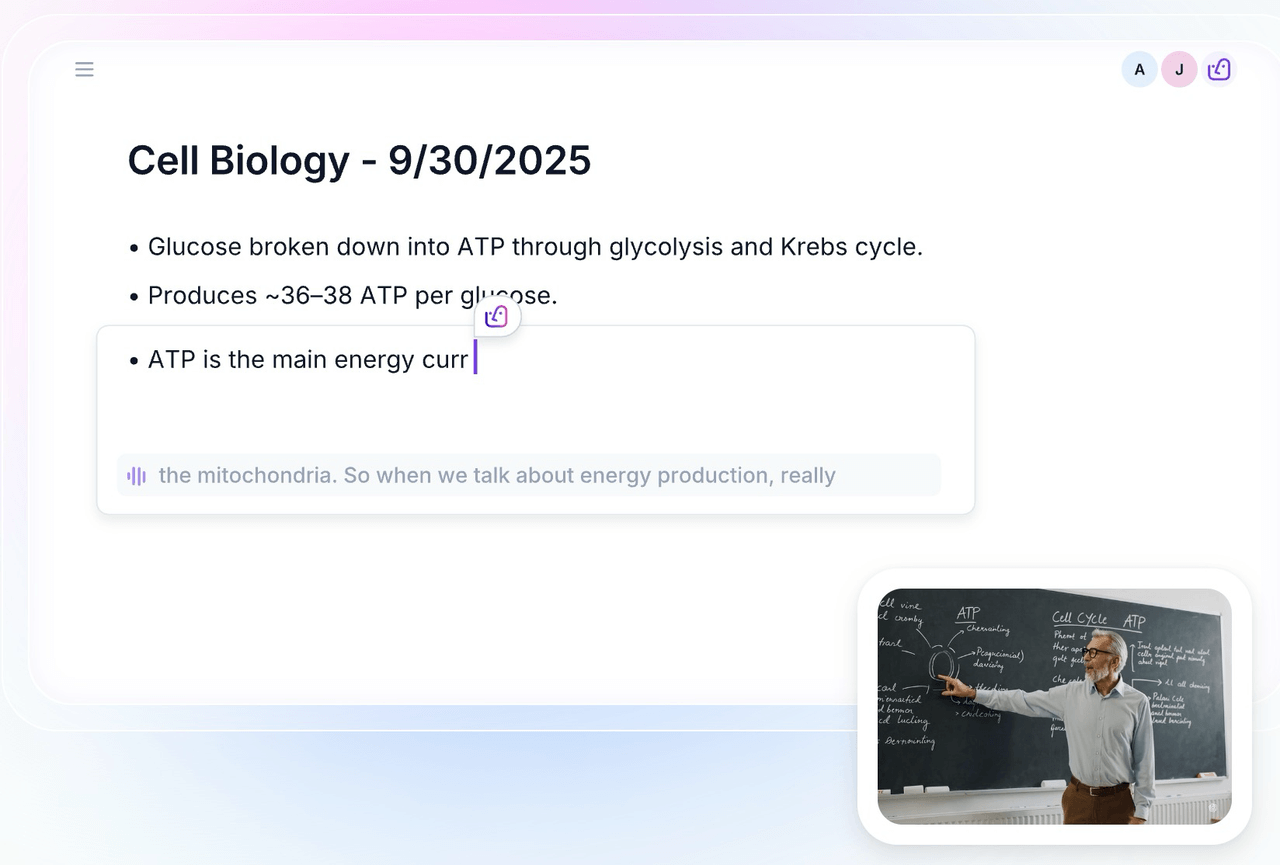
After testing every major option for recording Zoom lectures, Notigo stands out for a reason that might seem counterintuitive at first: it doesn't actually create video recordings. Instead, it does something far more useful for learning—it generates intelligent, structured notes in real time while you attend your Zoom lecture.
The Unique Advantage for Zoom Lectures
Here's how the Notigo workflow for Zoom lectures actually works: You open Notigo in your browser (separate tab) alongside your Zoom meeting. You join your Zoom lecture normally—no one knows you're using any external tools. You start Notigo's recording, and it begins capturing your system audio and generating lecture-aware notes in real time.
As your professor speaks and shares their screen, Notigo listens and structures the content. When the professor defines a new term, Notigo creates a definition section. When they work through an example, it gets captured as an example section. When they explain a concept, that explanation gets organized appropriately. You can see your notes forming live during the lecture.
Notigo is the best AI note taker for students—it helps you take lecture notes in real-time and understands the context. It's built for lectures, not meetings.
The key insight: You don't actually need a video recording of your Zoom lecture. What you need is the content from the lecture organized in a way you can study from. That's what Notigo provides.
Use Notigo to record your Zoom lectures effortlessly and in real-time.
Why This Works Better Than Video Recording
Think about what you typically do with a recorded Zoom lecture. You save the video file, then later you have to rewatch an hour-long recording to find the specific parts that matter. You're scrubbing through video, pausing, rewinding, trying to take notes while watching. It's enormously time-consuming.
Notigo eliminates that entire step. When your Zoom lecture ends, you immediately have organized notes ready to review. No rewatching required. The content is already structured by topic, with definitions, examples, and explanations clearly separated. You can start processing these notes into flashcards right away.
How It Handles Zoom-Specific Content
For verbal content and audio explanations, Notigo is exceptional. The professor's lecture gets captured and intelligently organized. Q&A discussions where students ask questions and professors provide explanations—all captured and structured.
For visual content from screen shares (slides, diagrams, code), Notigo captures the verbal explanation of what's being shown. You'll have notes that say "Professor explained the three-step process for analyzing data" with the steps listed. You won't have a screenshot of the slide itself. The practical solution: Take quick screenshots of key visuals while Notigo handles the explanatory content. This hybrid approach is actually faster than rewatching video later to find those same visuals.
For chat messages, Notigo doesn't capture the Zoom chat window. But honestly, most important chat content gets discussed verbally anyway. If a critical link gets shared in chat, you can copy it manually in the moment—that's just one click.
The Privacy and Permission Advantage
From a university policy perspective, Notigo is one of the safest options. You're not recording the Zoom meeting itself—you're taking notes with AI assistance. No bots join the call. No visible recording indicators appear. Other participants have no idea you're using any tool beyond attending normally.
This invisibility matters in small classes or with professors who are sensitive about recording. You're not creating any awkward dynamics or putting yourself in a position where you need to explain or justify your note-taking method.
Best For:
Students who want study-ready notes from Zoom lectures without the hassle of managing, storing, and rewatching large video files. Particularly excellent for:
- Lecture-heavy courses where verbal explanation dominates
- Classes with fast-paced content you can't manually note quickly enough
- Students using flashcard systems (Anki, RemNote) who need notes that process quickly into cards
- Anyone who doesn't have 200GB of free storage for video files
Limitations:
Notigo doesn't create a video archive of your Zoom lecture. If you specifically need to rewatch the exact visual of how a professor demonstrated something on screen, Notigo won't provide that. You're getting the explained content, not a video recording.
For highly visual courses—graphic design, architecture, art history where the visuals are the primary content—you might need to supplement with screenshots or use a video recording tool as backup.
Notigo also doesn't capture Zoom chat natively, though as mentioned, the important content usually gets discussed verbally anyway.
Real-World Scenario: Statistics Lecture
Let me walk you through a typical use case. You're in a statistics course that meets over Zoom. The professor shares their screen and walks through an Excel spreadsheet demonstrating how to calculate confidence intervals. They explain the formula, show each step of the calculation, discuss when you'd use 95% vs. 99% confidence, and work through a practice problem.
With Notigo running alongside Zoom:
- The explanation of confidence intervals gets captured as a clear definition section
- The steps of the calculation get listed in order with explanations
- The discussion of when to use different confidence levels becomes a separate explanatory section
- The practice problem gets captured with the solution steps
You take 2-3 screenshots of the key Excel tables during the demonstration. Total time: 10 seconds.
After the 60-minute lecture, you have:
- Comprehensive, organized notes from Notigo (ready to review immediately)
- A few screenshots of the visual tables
- Total processing time to create flashcards: 20 minutes
Compare to recording the lecture as video:
- 60-minute video file (several GB)
- Need to rewatch at 1.5x speed = 40 minutes viewing time
- Pause to take notes while watching = another 30 minutes
- Total processing time: 70+ minutes
The efficiency gain is enormous. Notigo saves you 50 minutes per lecture, and that compounds across every class session throughout the semester.
Pricing: $4.17/month (annual) or $4.90/month (monthly). Unlimited recordings on paid plans.
For detailed guidance on getting the most from Notigo with your Zoom lectures, see our Ultimate Guide to Using Notigo for Lecture Notes.
#2: Otter.ai - Best for Transcription with Speaker Identification
&Otter.ai: Second to Notigo, but with a different approach&
Score: 8.0/10
Otter.ai is one of the most established names in AI transcription, and for Zoom lectures specifically, it offers some genuinely useful features—along with some significant drawbacks that students need to understand before choosing it.
What It Is and How It Works for Zoom
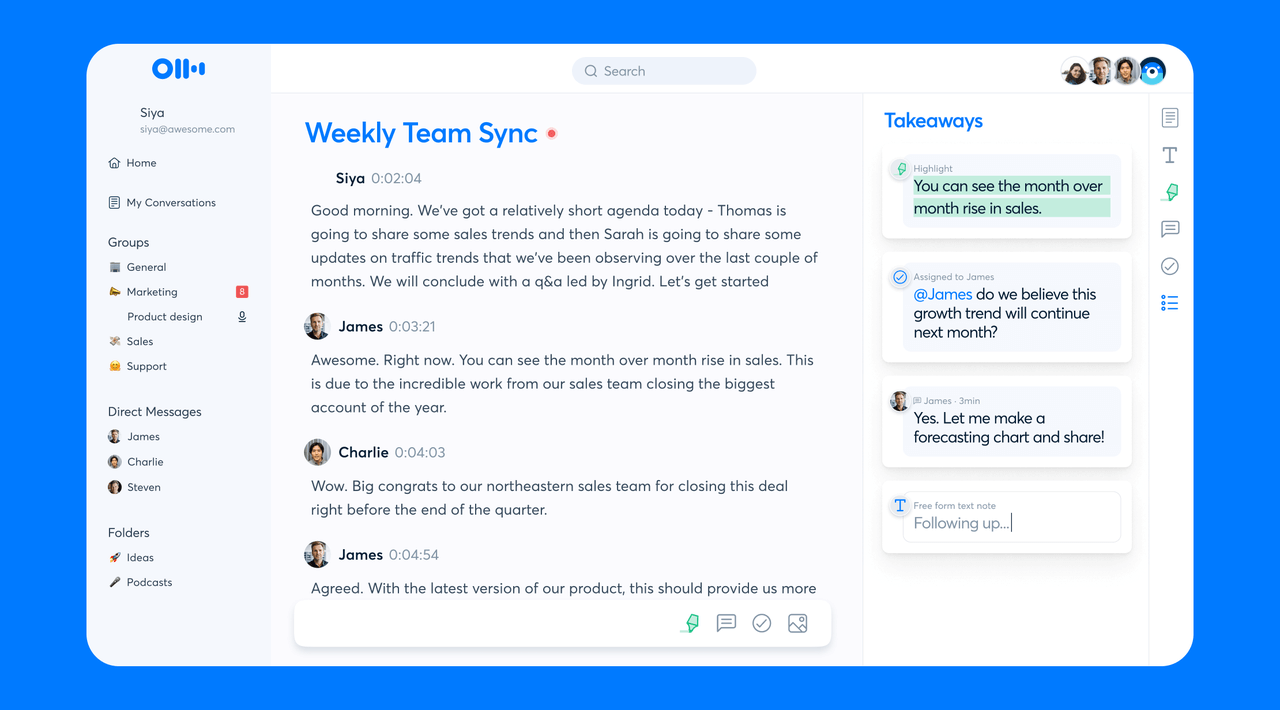
Otter is fundamentally a transcription service that integrates with Zoom through a meeting bot. You connect Otter to your calendar, it detects your Zoom meetings, and "Otter.ai" joins the call as a virtual participant. It records audio from the meeting and produces real-time transcription that you can view during or after the lecture.
The transcription quality is genuinely excellent—Otter handles different accents, technical terminology, and varied audio quality reliably. For pure transcription accuracy, it's one of the best tools available.
Otter.ai is good for business use cases and zoom meetings because of its great transcription detail and speaker identification.
The Zoom-Specific Advantages
Where Otter excels for Zoom lectures is in handling discussions with multiple speakers. The AI attempts to identify different speakers and label them accordingly. In discussion-heavy seminars or graduate courses where students frequently ask questions and contribute, this speaker identification is valuable. You can see who said what, when they said it, and search for specific contributions later.
Otter also captures chat messages from the Zoom meeting and integrates them into the transcript timeline. If someone shares a link at the 23-minute mark, that link appears in the transcript at that timestamp. This integration of text chat with audio transcript is useful for not losing important shared resources.
The search functionality is powerful. After the lecture, you can search your entire semester's worth of transcripts for a specific term or concept. Otter will show you every instance across all recordings with clickable timestamps. For studying or reviewing specific topics across multiple lectures, this is genuinely useful.
The mobile app works well for when you need to join Zoom lectures from your phone and want transcription. Less ideal than laptop-based learning, but functional for students on the go.
The Bot Visibility Problem
Here's the major drawback for Zoom lectures: Otter joins your meeting as a visible participant. Everyone in the call can see "Otter.ai" or "Otter Assistant" in the participant list. In small seminars or intimate classes, this is awkward. Other students wonder what it is. Professors might ask you to remove it. Some instructors have policies against bots in their Zoom classes.
In large lecture courses (100+ students), the bot is less noticeable and less problematic. One more name in a long participant list doesn't stand out. But for small classes, the visibility creates social and policy friction that invisible recording methods avoid.
Some professors, upon seeing a bot, will immediately disable it or kick it from the call. If multiple students are using Otter, you end up with multiple bots cluttering the participant list, which looks unprofessional and can frustrate instructors.
Transcript vs. Study Notes
Like most transcription services, Otter outputs transcripts, not lecture-structured notes. You get an accurate record of everything that was said, but it's still organized chronologically rather than topically. You'll spend time after the lecture reading through the transcript and organizing content into study materials.
The AI summary feature attempts to extract key points, but it's built for business meetings. You'll get summaries that talk about "discussion topics" and "important moments" rather than educational structure like definitions, examples, and conceptual explanations.
This means more post-lecture processing time compared to tools like Notigo that generate study-ready structure from the start.
Best For:
Students in discussion-heavy courses where speaker identification matters. Graduate seminars, upper-level humanities courses with significant student participation, or any class where tracking who contributed what ideas is valuable.
Also good for students in fully online programs where recording tools are normalized and accepted. If you're getting an MBA via Zoom and everyone uses recording bots, Otter's visibility isn't a problem.
Limitations:
- Visible bot in participant list (potentially awkward or prohibited)
- Transcripts require post-processing into study notes (adds 30-60 minutes per lecture)
- Meeting-centric AI summaries don't fit educational context as well as lecture-aware tools
- More expensive than student-focused alternatives ($8.33/month vs. Notigo's $4.17/month)
- Free plan is quite limited (600 minutes per month sounds like a lot but can disappear quickly with multiple hour-long lectures weekly)
When Otter Makes Sense Over Notigo:
If you're in small discussion-based seminars where identifying different speakers' contributions is important, Otter's strength in speaker identification might outweigh Notigo's strength in structured note generation. If you need to know exactly which classmate proposed which interpretation of a text, Otter delivers that.
If you have explicit permission to use recording bots (professor has approved it, or it's normalized in your program), then Otter's visibility disadvantage disappears.
For a detailed comparison of how these two tools handle student use cases differently, see our Otter.ai vs. Notigo comparison.
Pricing: Free plan (600 minutes/month), Pro $8.33/month (annual billing) or $16.99/month (monthly)
#3: OBS Studio - Best Free Full Video Recording Solution
OBS Studio: A free solution for simple recordings.
Score: 8.5/10
OBS Studio (Open Broadcaster Software) is professional-grade, open-source screen recording software that's completely free. For students who need full video recordings of Zoom lectures—capturing everything visible on screen plus audio—OBS is the best free solution available.
What It Is
OBS is screen recording software originally designed for video game streaming and content creation. But its power and flexibility make it excellent for recording Zoom lectures. It captures your entire screen (or specific windows), records system audio, and produces high-quality video files.
Unlike meeting bots that join your Zoom call, OBS records your local computer. You join Zoom normally, then OBS captures everything happening on your screen. To other Zoom participants, you're just another attendee—they have no idea you're recording.
OBS can be used to create high-quality screen recordings, including Zoom lectures.
Why It Ranks High for Zoom Lectures
The biggest advantage is completeness. OBS captures everything: the video of your professor, screen-shared content, slides, demonstrations, chat window if you have it visible, participant gallery if you want it. You get a perfect record of exactly what you saw during the lecture.
This matters most for visually intensive courses. If you're in a graphic design class where the professor is demonstrating Photoshop techniques, or a coding course where they're walking through programming examples, or an architecture course with complex 3D models—the visual content is crucial. OBS captures it all in full quality.
The cost is unbeatable: completely free, no limitations, no watermarks, no time restrictions. For students on tight budgets who need full video recording capabilities, OBS can't be matched on value.
It's also completely invisible. No bots appear in your Zoom meeting. No recording notifications go to other participants. You're recording your own screen, which is fundamentally different from recording the Zoom meeting itself.
The Setup Trade-Off
OBS is powerful, which means it's more complex than simple recording apps. The first time you set it up for recording Zoom lectures, you'll spend 15-30 minutes configuring settings:
- Adding your Zoom window as a display source
- Configuring audio routing to capture system sound
- Setting recording quality and format (balancing quality vs. file size)
- Choosing where files save on your computer
This initial configuration has a learning curve. There are dozens of settings and options. For students who aren't technically inclined, it can feel overwhelming.
However, once you've configured OBS correctly, subsequent recordings are simple. You open OBS, start recording, join your Zoom lecture, and stop recording when done. The complexity is front-loaded.
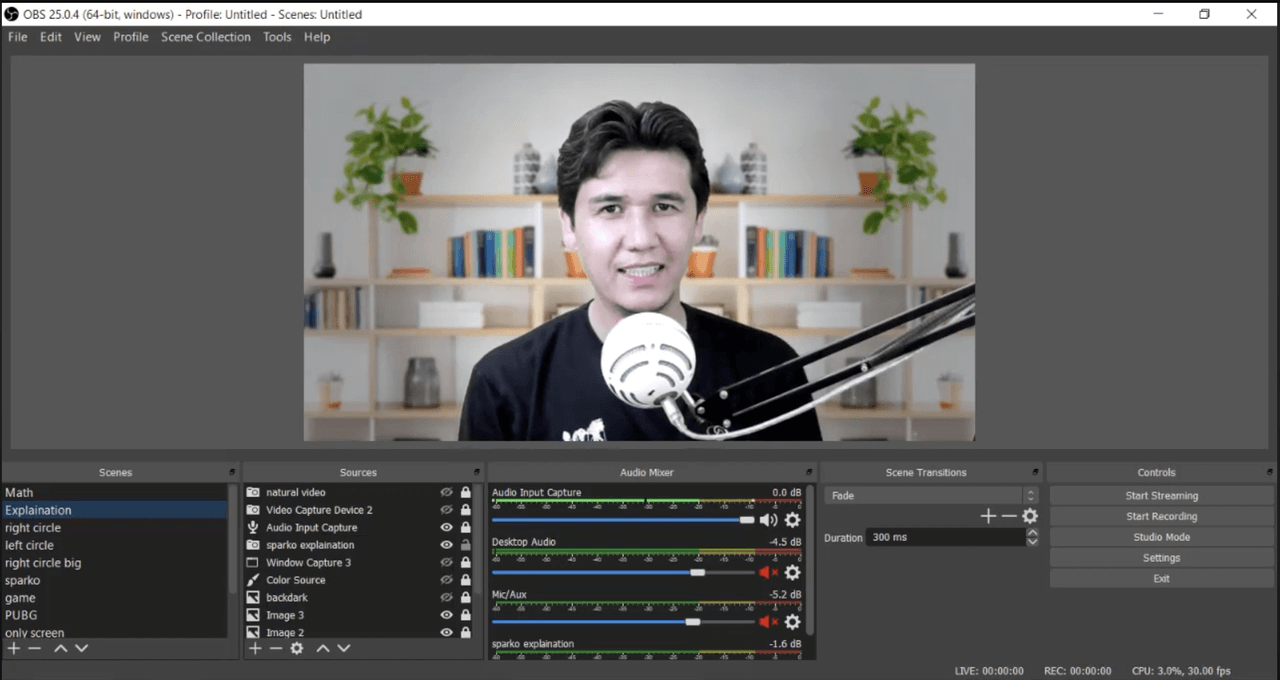
How to Set Up OBS for Zoom Recording
Here's a simplified setup process:
- Install OBS Studio (free download from obsproject.com)
- Add a Display Capture source:
- In the Sources panel, click the + button
- Select "Display Capture" to record your entire screen, or "Window Capture" to record just your Zoom window
- Choose your monitor/window and click OK
- Configure audio:
- In the Audio Mixer panel, ensure "Desktop Audio" is enabled
- This captures system sound (what you hear from Zoom)
- If you also want to record your microphone, enable "Mic/Auxiliary Audio"
- Set recording settings:
- Go to Settings > Output
- Recording Quality: "High Quality, Medium File Size" is good balance
- Recording Format: MP4 (most compatible)
- Set your recording path (where files save)
- Test before your first real lecture:
- Join a practice Zoom meeting or watch a YouTube video
- Click "Start Recording" in OBS
- Record 2-3 minutes
- Click "Stop Recording"
- Find the file and verify audio and video quality
Once configured, your ongoing workflow is simple: Open OBS, click Start Recording before your Zoom lecture, click Stop Recording afterward.
File Management Considerations
OBS creates video files, and video files are large. An hour-long lecture at 1080p might be 1-3GB depending on your settings. Over a semester with multiple courses, this adds up quickly.
Strategies for managing file sizes:
- Record at 720p instead of 1080p (significantly smaller, still quite readable)
- Delete recordings after processing them into study notes
- Store only recordings for upcoming exams, archive or delete older ones
- Use external hard drive or cloud storage for archival
Best For:
Students who specifically need full video recordings of Zoom lectures. This is particularly valuable for:
- Highly visual courses (design, architecture, art, video production)
- Technical demonstrations (programming, engineering software, lab procedures)
- Courses where visual details matter more than verbal explanations
- Students who learn well from rewatching demonstrations
Also excellent for students who want maximum control and don't mind some initial technical setup.
Limitations:
- Requires software installation and initial configuration (not as instant as browser-based tools)
- Creates large video files (storage management required)
- Recording entire lectures as video means you still need to process content into study notes
- Not as optimized for quick note-taking as tools like Notigo
When OBS Makes Sense:
If your Zoom lectures involve complex screen-shared content that you need to rewatch—software demonstrations, design critiques, visual analysis—OBS captures everything perfectly.
If you want a complete archive of lectures and have the storage space, OBS provides that better than any other free tool.
If you're technically comfortable and value having full control over your recording setup, OBS delivers professional-grade results.
Pricing: Completely free (open source)
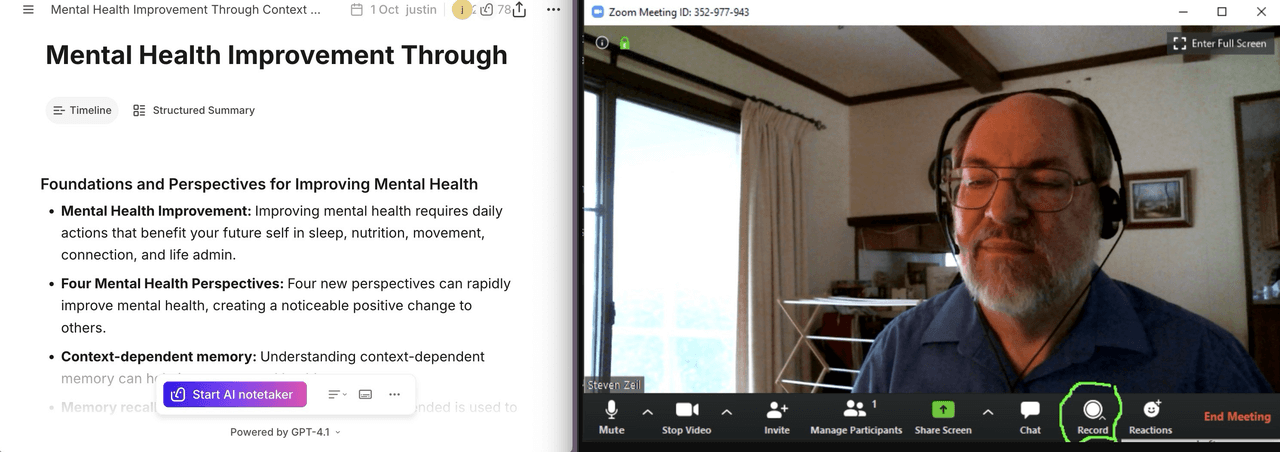
#4: Zoom's Built-in Recording - Best When Professor Enables It
Score: 7.0/10
Zoom's native recording feature deserves discussion because when it's available, it's excellent. But the "when it's available" caveat is exactly why this article exists.
What It Is
Zoom includes built-in recording that can save lectures locally to your computer or to Zoom's cloud storage. When enabled by the host, it captures everything: video, audio, screen shares, active speaker view or gallery view, and even the chat transcript as a separate text file.
The quality is high, the integration is seamless, and it's included free with Zoom—no additional cost or tools required.
Why It Ranks Here (Not Higher)
In most university Zoom lectures, only the host (your professor) can record. Professors often disable participant recording for various reasons:
- Concern about recordings being shared publicly
- Copyright issues with slides and course materials
- Desire to control distribution of lectures
- Privacy concerns about other students being recorded
This means for most students in most classes, Zoom's built-in recording simply isn't an option. You can't use it even if you want to.
Why most students can't use Zoom recording: Most professors disable this setting
Some professors do record lectures themselves and share the recordings with students afterward. This seems helpful, but it's not the same as having your own recording:
- They might forget to record
- They might not share recordings promptly (or at all)
- Recordings might only be available for limited time
- You're dependent on someone else's system
When You Can Actually Use It
There are specific scenarios where Zoom's built-in recording becomes available to you:
You're hosting the Zoom meeting: Your own study group, recorded review session with classmates, or any meeting where you're the host. In these cases, you have full recording control.
Professor explicitly enables participant recording: Some instructors do enable this setting, allowing any participant to record locally. It's rare, but it happens.
University provides blanket permission: Some schools have policies that allow recording for accessibility reasons, and professors are required to enable participant recording.
How to Use It When Available
If you do have access to participant recording:
- Before the meeting, enable local recording in your Zoom settings:
- Settings > Recording > Record to this computer
- During the meeting, click "Record" in the Zoom toolbar
- Recording indicator appears (everyone sees notification)
- Recording saves to your computer automatically
- After meeting, Zoom converts recording to MP4
- Default location: Documents/Zoom folder
- Includes video file and chat transcript
The files are well-organized by date and meeting title, making them easy to find later.
Advantages When It Works
- Highest quality capture (native to Zoom platform)
- Captures everything: video, audio, screen shares, chat as separate file
- No third-party tools or complexity
- Free (included with Zoom)
- Local storage means you control the file
Why This Still Isn't a Complete Solution
Even when you can use Zoom's recording, you face the same challenge as any video recording: you have an hour-long video file that you need to process into study notes. Video is not a study material—it's raw content that requires significant time investment to transform into something you can actually learn from.
You'll still need to either:
- Rewatch the video and take notes (time-consuming)
- Use transcription tools to convert audio to text
- Extract key moments through manual review
Best For:
Study groups where you're the host, professors who explicitly allow recording, or situations where you have permission to use Zoom's native features.
Limitations:
- Usually unavailable (professors disable participant recording)
- When available, creates recording notification visible to everyone
- Outputs video files that still require processing into study notes
- File management for large video files required
Pricing: Free (included with Zoom)
#5: Fireflies.ai - Not Recommended for Most Students
Score: 6.0/10
Fireflies.ai is a powerful meeting assistant that appears in many "best of" lists for AI note-taking. It's genuinely excellent for business professionals who live in virtual meetings all day. But for students trying to record Zoom lectures? It's one of the worst options available.
We covered Fireflies extensively in our Fireflies vs. Notigo comparison, but it's worth addressing specifically why it fails for Zoom lecture scenarios.
How It Works (And Why That's a Problem)
Fireflies operates through a meeting bot called "Fred" or "Fireflies Notetaker" that joins your Zoom call as a visible participant. Everyone in the meeting can see this bot in the participant list. The bot records audio from the meeting and produces transcriptions and AI-generated summaries.
For corporate meetings where everyone expects and accepts recording bots, this works fine. For academic Zoom lectures, it creates immediate problems.
The Visibility Problem Is Worse in Small Zoom Classes
In a 15-person seminar, having "Fireflies Notetaker" appear in the participant list is extremely conspicuous. Your professor notices immediately. Other students wonder what it is. You're put in the position of having to explain or justify your recording method, which draws attention you probably don't want.
Some professors will immediately ask you to remove the bot. Others might send you a private message asking what it is. In worst cases, they'll kick the bot from the call entirely, and suddenly your "recording solution" stops working mid-lecture.
If multiple students in the class use Fireflies (or similar bot-based tools), you end up with several bots cluttering the participant list. This looks unprofessional and can genuinely annoy instructors who feel their class has been invaded by AI assistants.
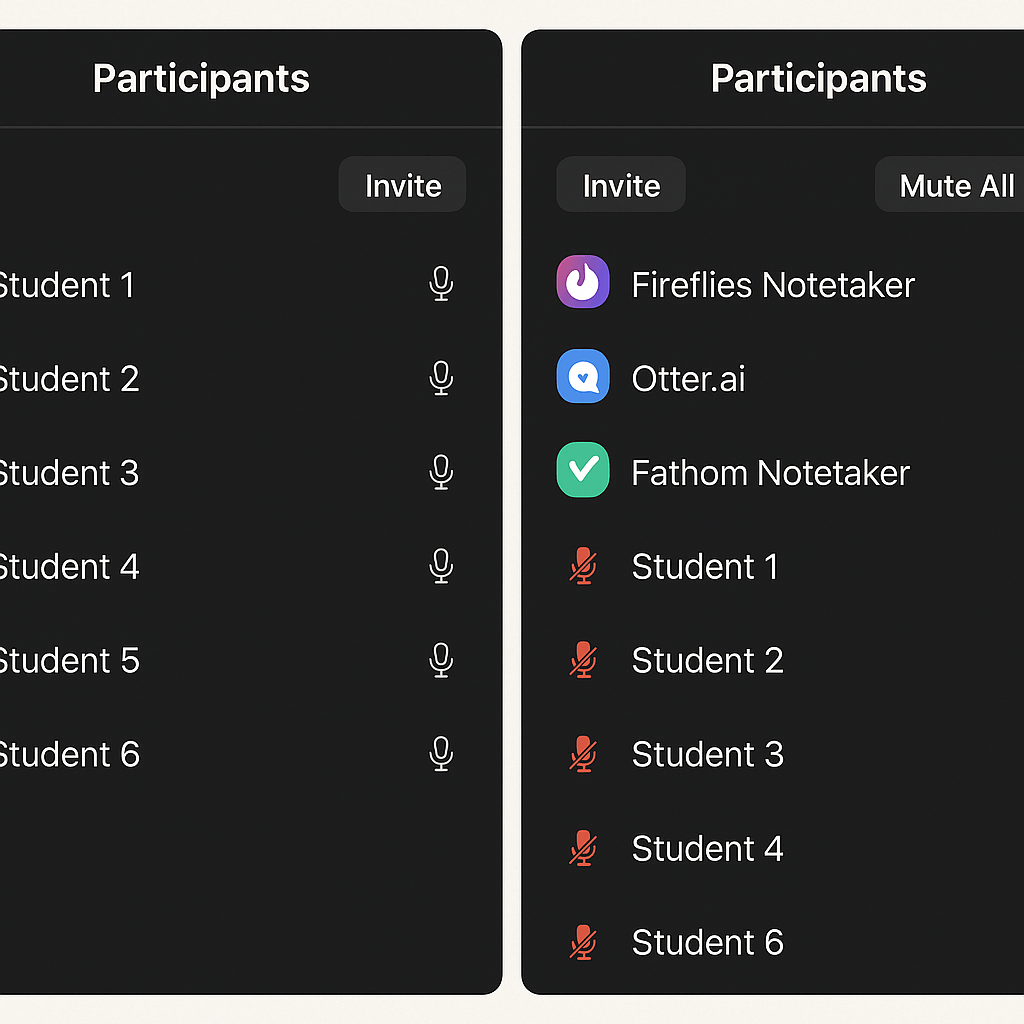
The clutter problem: Meeting bots are noticed very easily in small zoom lectures, and the more students use them, the more annoying it gets for everyone.
The Predatory Onboarding Makes It Worse
Before you can even test whether Fireflies works for your Zoom lectures, you're forced through invasive onboarding. The app requires full calendar access—it won't let you proceed without connecting Google Calendar, Outlook, or another calendar service. This means giving Fireflies permission to see every event in your life, not just your Zoom lectures.
The default settings are designed to be predatory toward students. When you enable "unlimited free transcripts" (which sounds great), you're actually agreeing to:
- Automatically join ALL meetings on your calendar
- Automatically send meeting summaries to EVERYONE on the invite list
Imagine your professor receiving an AI-generated email after every lecture with a summary and transcript, courtesy of your note-taking app. Imagine your classmates getting spammed with these emails. It's a marketing tactic disguised as a feature, and it's completely inappropriate for educational settings.
The Free Plan Is Essentially Unusable
Fireflies' free tier allows only three meetings before forcing you to upgrade. For a student taking four or five classes per week, you hit that limit in a single day. This isn't a trial—it's a forced conversion designed to push you toward paying before you can properly evaluate whether the tool works for you.
Business Features You're Paying For (And Don't Need)
When you do upgrade to make Fireflies usable, you're paying $10-19 per month for features that provide zero value in educational contexts:
- CRM integrations (Salesforce, HubSpot)
- Team collaboration workspaces
- Conversation intelligence and analytics
- Action item extraction
These are business features built for sales teams and project managers. As a student, you're subsidizing enterprise functionality you'll never use, paying 2-4x what student-focused tools cost.
Meeting-Style Summaries Don't Fit Lectures
Even when Fireflies does transcribe your Zoom lecture successfully, the AI summary assumes business meeting context. You get sections about "key decisions," "action items," and "next steps"—none of which make sense for educational content.
A biology lecture on cellular respiration gets summarized like it was a project status meeting. The AI doesn't understand that professors are teaching concepts, not managing deliverables. This fundamental mismatch in context means the summaries aren't actually useful for studying.
When Fireflies Might Make Sense (Rare Cases)
The only scenario where Fireflies isn't terrible for students: You're in a professional graduate program (MBA, executive education) where recording tools are completely normalized and everyone—professors and students alike—uses similar bots. In those environments, the visibility and business-focus actually align with the context.
Or if you have a part-time job involving frequent Zoom meetings, Fireflies might be valuable for that professional work. But you'd still need a different tool for your actual classes.
Why Notigo or OBS Are Better for Zoom
For every advantage Fireflies claims, there's a better alternative:
- Want transcription? Otter is more student-appropriate
- Want structured notes? Notigo is designed for lectures
- Want full recording? OBS is free and invisible
- Want to save money? Literally any other tool on this list
Best For: Honestly difficult to recommend for student use cases. Maybe large MBA programs where bots are normalized.
Limitations:
- Visible bot creates awkward situations in classes
- Free plan (3 meetings) essentially forces immediate upgrade
- Expensive ($10-19/month) relative to student-focused alternatives
- Predatory onboarding with forced calendar access
- Business-focused features don't help with studying
- Meeting-style summaries miss educational context
- Many professors will kick the bot from calls
Pricing: Free (3 meetings only—useless for semester-long courses), Pro $10/month (annual) or $18/month (monthly), Business $19/month (annual) or $29/month (monthly)
For a comprehensive breakdown of why Fireflies doesn't work for students despite being popular with professionals, read our Fireflies vs. Notigo comparison.
Honorable Mentions: Other Tools Worth Knowing
A few other tools deserve brief mention, even though they didn't make the main rankings:
Tactiq - Chrome extension that transcribes Zoom meetings in your browser. Works only if you're using Zoom in Chrome (not the desktop app). Simple and lightweight, but limited functionality and browser-only restriction makes it less versatile than other options. Good for students who exclusively use browser-based Zoom and just want basic transcription.
Camtasia - Professional video editing and screen recording software. Excellent quality but costs around $300 for a license. Way too expensive for students who just need to record lectures. Only makes sense if you're also doing significant video editing work for other purposes.
Windows Game Bar / Mac Screenshot Tools - Built-in OS recording features. Free and readily available, but limited compared to dedicated tools. Work in a pinch, but you'll likely want something more robust for regular lecture recording.
CleanShot X (Mac) - Polished screen recording for Mac users. At $29/year, it's reasonably priced and very user-friendly. Good option for Mac students who want simple, high-quality screen recording without OBS complexity.
Comparison Table: Quick Reference
| Tool | Best For | Visibility | Cost | Video Recording | Structured Notes | Score |
|---|---|---|---|---|---|---|
| Notigo | Study-ready notes | Invisible | $4.17-4.90/mo | ❌ | ✅ Excellent | 9.0/10 |
| Otter.ai | Speaker ID | Visible bot | $8.33+/mo | ❌ | ❌ Transcripts only | 8.0/10 |
| OBS Studio | Full video | Invisible | Free | ✅ Excellent | ❌ | 8.5/10 |
| Zoom Built-in | When available | Visible notification | Free | ✅ Excellent | ❌ | 7.0/10 |
| Fireflies.ai | Not recommended | Visible bot | $10-19/mo | ❌ | ❌ Meeting-style | 6.0/10 |
How to Choose Based on Your Zoom Course Format
The right recording tool depends significantly on your specific course format and content type. Here's how to match tools to your situation.
Large Lecture Courses (100+ students)
In massive Zoom lectures, individual recording methods matter less because you're essentially anonymous in the crowd. A bot in the participant list with 200 other names is barely noticeable.
Priorities: Note quality and study efficiency matter more than invisibility
Best choices:
- Notigo if you want structured notes without video files
- Otter if you need transcripts and don't mind bot visibility
- OBS if lectures involve complex visuals you need to rewatch
Why it works: Professor unlikely to notice or care about recording tools in large classes. Focus on what produces the best study materials.
Small Seminar Courses (10-20 students)
Intimate classes where everyone can see the participant list clearly. Any bots or unusual activity stands out immediately.
Priorities: Invisibility and professionalism
Best choices:
- Notigo (completely invisible, no bots)
- OBS (invisible screen recording)
- Ask professor for permission to use Zoom's built-in recording
Avoid: Visible bots (Otter, Fireflies) that create awkward dynamics in small groups
Why it works: Maintains professional appearance while still capturing content. No explanations needed about recording methods.
Discussion-Heavy Classes
Seminars or courses where students contribute significantly, multiple people speak in each session, and tracking who said what matters for understanding the discussion flow.
Priorities: Speaker identification and complete discussion capture
Best choices:
- Otter.ai (excellent speaker tracking, even if bot is visible)
- Ask professor to record with Zoom's built-in feature
Consider: In discussion courses, recording often needs professor permission anyway since you're capturing other students' contributions. Better to ask explicitly.
Why it works: Speaker identification is genuinely valuable when ideas are attributed to different participants. Worth the trade-off of bot visibility in this context.
Lecture + Screen Share Heavy
Courses where professors spend most of Zoom time sharing screens with slides, demonstrations, software tutorials, code examples, or other visual content.
Priorities: Capturing visual content accurately
Best choices:
- OBS (full-quality screen recording of everything shown)
- Notigo + screenshots (structured notes of explanations, manual captures of key visuals)
Why it works: Visual content often needs to be reviewed, not just referenced. Full screen recording ensures you don't miss crucial details.
Your Own Study Groups/Presentations
When you're hosting the Zoom meeting for group work, practice presentations, or study sessions with classmates.
Priorities: Simplicity and sharing capability
Best choices:
- Zoom's built-in recording (you're the host, full control)
- OBS if you want local control without Zoom notifications
Why it works: As host, you can enable recording freely. Other participants are typically fine with recording study sessions. Easiest approach when available.
The Study Workflow: What to Do with Zoom Recordings
Recording your Zoom lecture is only the first step. What you do with that recording determines whether it actually helps you learn or just clutters your hard drive. Here's the evidence-based approach to transforming recordings into long-term knowledge.
The Problem with Video Recordings
Let's be honest about what typically happens when students save video recordings of Zoom lectures: The files sit on their computer for weeks. When exam time comes, they feel guilty about not reviewing them. They might watch portions at 2x speed in a panic. They don't actually learn much from this passive rewatching.
Video recordings have fundamental limitations as study materials:
They're passive. Watching a lecture again is not meaningfully different from watching it the first time. You're not testing yourself, not actively retrieving information, not building the neural pathways that create lasting memory. As we covered in our guide on effective study techniques, passive review is one of the least effective learning methods.
They're time-consuming. Even at 1.5-2x speed, rewatching an hour-long lecture takes 30-40 minutes. Finding specific information means scrubbing through video, guessing at timestamps, and rewinding when you overshoot.
They're not searchable. Need to review what the professor said about enzyme kinetics? Good luck finding that specific 3-minute segment in a 60-minute video without watching large portions.
They create storage problems. Video files are massive. Ten lectures at 2GB each = 20GB gone. Over a full semester with multiple courses, you're looking at 100+ GB of video files that you may never actually watch.
The Better Approach: Transform Immediately
The most effective approach is to process your Zoom recording into study materials within 24 hours of the lecture. This is when the content is freshest in your mind and when you can most efficiently transform recording into notes.
If you have video recordings (OBS, Zoom built-in):
- Watch at 1.5-2x speed (saves time while maintaining comprehension)
- Pause whenever key concepts appear and take notes
- Screenshot important visual moments (slides, diagrams, demonstrations)
- Create flashcards as you go: "What are the three types of X?" "Define Y" "Explain the process of Z"
- Once processed into notes and flashcards, delete or archive the video
Total time investment: 40-50 minutes to process a 60-minute lecture Result: Study-ready flashcards and organized notes
If you have transcripts (Otter):
- Scan the transcript quickly for key concepts (10-15 minutes)
- Copy important sections into a new document
- Organize copied content by topic (what goes together conceptually?)
- Add clarifying notes based on your memory of the lecture
- Create flashcards from the organized content
Total time investment: 50-60 minutes to process a 60-minute lecture Result: Organized notes and flashcards
If you have structured notes (Notigo):
- Review the AI-generated notes (already organized by topic)
- Add your own annotations, examples, or clarifications
- Identify areas where you're confused or need more info
- Create flashcards directly from the structured sections
- You're ready to study
Total time investment: 20-30 minutes to process a 60-minute lecture Result: Study-ready flashcards and comprehensive notes

The processing workflow: With Video or transcripts, you will spend a lot of time refactoring. But with Notigo, you can save yourself from that, and get ready-made study materials instantly.
The Time Math That Matters
Let's be concrete about the time savings across a semester:
Traditional video recording approach:
- 60-minute lecture → 60-minute video file
- Processing: 40 minutes (watching at 1.5x + taking notes)
- Creating flashcards: 20 minutes
- Total per lecture: 60 minutes processing
Transcript approach:
- 60-minute lecture → transcript
- Processing: 50 minutes (reading, organizing, creating flashcards)
- Total per lecture: 50 minutes processing
Structured notes approach (Notigo):
- 60-minute lecture → organized notes
- Processing: 25 minutes (review + flashcard creation)
- Total per lecture: 25 minutes processing
Over a semester:
- 15 weeks × 3 lectures per week = 45 lectures
- Video approach: 45 hours of processing time
- Transcript approach: 37.5 hours
- Structured notes: 18.75 hours
Time saved with Notigo: 26.25 hours per semester
That's more than an entire week of full-time work saved just on processing lecture recordings. Those hours can go toward actual studying (active recall, practice problems, spaced repetition) rather than creating study materials.
Integration with Study Systems
Once your recordings are processed into notes, they need to integrate with effective study techniques. The best recording method is the one that feeds most efficiently into your study workflow.
For flashcard-based studying (Anki, RemNote): Structured notes are dramatically easier to transform into good flashcards. Each concept is already isolated, each definition is already clear, each example is already separated. You can create quality flashcards in minutes.
With transcripts, you're still hunting through text to figure out what constitutes a discrete testable concept. This friction means many students create fewer flashcards than they should, or create poorly formulated cards that don't test effectively.
For practice problem-based studying (STEM fields): You need clear understanding of concepts and procedures. Structured notes that separate "what this concept means" from "how to apply it" from "common mistakes" are immediately useful for problem-solving practice.
Video recordings mean you might need to rewatch demonstrations multiple times while working through practice problems—significantly slower than referencing organized notes.
For essay-based learning (humanities): You need to synthesize ideas across multiple lectures and readings. Searchable, organized notes make finding relevant concepts and quotes far easier than scrubbing through video files hoping to find where the professor mentioned a particular theorist.
The key insight: Your recording method should make the next step in your study workflow easier, not harder. Tools that output study-ready materials (structured notes) are more valuable than tools that output raw data (video files or transcripts) that still require substantial processing.
Technical Tips for Better Zoom Recordings
Regardless of which tool you choose, these technical practices will improve your recording quality and make the files more useful.
Audio Quality Matters Most
Poor audio makes any recording nearly useless. Even the best AI transcription fails with muddy, echo-filled audio.
Use headphones with a microphone: This reduces echo and feedback. When you play Zoom audio through speakers, your microphone picks it up and creates echo loops. Headphones solve this completely.
Test your audio settings before important lectures: Join a test Zoom meeting (or call a friend) and verify that audio sounds clear. Check both what you hear from others and what they hear from you.
Position your microphone well: If you use your laptop's built-in mic, make sure it's not covered by papers or other objects. External USB microphones ($20-30) provide significantly better audio quality if you're recording regularly.
Close other audio programs: Chrome tabs playing music, Spotify in the background, notification sounds—all of these can bleed into your recording. Close unnecessary programs before recording Zoom lectures.
Screen Capture Settings
For tools that record video (OBS, Zoom built-in), your recording settings affect both quality and file size.
Record at 1080p for most lectures: This is high enough quality to read text on shared screens but doesn't create unnecessarily huge files. Recording at 4K is overkill and quadruples file size for minimal benefit.
Don't record higher than your screen resolution: If you have a 1080p display, recording at 1080p captures everything. Recording at higher resolution doesn't add information and just inflates file size.
Frame rate doesn't matter much: 30fps is plenty for lecture recording. You're not recording fast action—you're recording someone talking and occasionally advancing slides. Don't waste storage space on 60fps when 30fps looks identical for this content.
Balance quality and storage: In OBS, the "High Quality, Medium File Size" preset is ideal for students. You get readable recordings without filling your hard drive.
File Management and Organization
Good organizational habits prevent the "I recorded everything but can't find anything" problem.
Create a clear folder structure:
Zoom Recordings/
├── Fall 2024/
│ ├── PSYCH 101/
│ │ ├── Week 1 - Introduction/
│ │ ├── Week 2 - Research Methods/
│ │ └── ...
│ ├── CHEM 201/
│ └── ...
└── Spring 2025/
Name files descriptively: Not "Zoom_Recording_2024-09-15.mp4" but "PSYCH101_Week3_Memory_Systems_2024-09-15.mp4". You'll thank yourself later when searching for specific lectures.
Back up important recordings: External hard drive, cloud storage (if privacy allows), or both. Technology fails. Don't lose a semester of recordings to a crashed hard drive.
Delete after processing: Once you've transformed a recording into study notes and flashcards, you don't need the original file anymore. Delete it to free up storage space. If you're uncomfortable deleting, at least archive old recordings to external storage.
Testing Your Setup
The worst time to discover your recording tool doesn't work is five minutes into an important lecture.
Do a complete test run:
- Set up exactly as you would for a real lecture
- Join a test Zoom meeting (or play a YouTube video)
- Record 5-10 minutes
- Stop and locate the file
- Verify both audio and video quality
- Check file size is reasonable
- Confirm you know how to access and process the recording
Do this test ideally a week before the semester starts. That gives you time to troubleshoot issues or try alternative tools without the pressure of missing real lecture content.
Legal and Ethical Considerations
Recording Zoom lectures involves navigating a more complex permission landscape than recording in-person classes. Understanding both the legal framework and ethical considerations helps you make responsible choices.
Know Your University's Policy
University policies on recording vary dramatically. Some schools explicitly support recording as an accessibility tool. Others require explicit permission from instructors. Some prohibit recording except under specific disability accommodations.
Where to find your school's policy:
- Student handbook (usually has a section on classroom recording)
- Office of Student Disability Services (often clarifies recording rights)
- IT/technology use policy
- Your syllabus (professors sometimes state their recording policy)
Don't assume. Take 15 minutes to actually look up and read your institution's specific policy before recording any lectures.
Common policy types:
- Permissive: Students may record for personal educational use without permission
- Consent-required: Students must get instructor permission before recording
- Restrictive: Recording only allowed with official disability accommodation
- Prohibited: No recording allowed under any circumstances
Most universities fall somewhere in the middle—permitted with reasonable limitations.
When to Ask Permission
Even if your university policy technically allows recording without permission, there are situations where asking is the right approach.
Ask explicitly when:
- Small seminar courses where everyone knows each other
- Discussion-based classes where students share personal experiences
- Courses involving sensitive topics (trauma, mental health, personal narratives)
- When you'll be using visible recording methods (bots that appear in participant list)
- Guest speakers are presenting (they might have different expectations)
How to ask effectively: "Professor, I'd like to record Zoom lectures for personal study purposes to help me review material and create study notes. I won't share the recordings and will delete them after the semester ends. Is that okay with you?"
Most professors say yes when you frame it as a learning tool and assure them about limited use.
You likely don't need to ask when:
- Large lectures (100+ students) with minimal student participation
- University policy explicitly permits recording
- You're using invisible methods (screen recording) that don't affect others' experience
- Recorded content is purely professor presenting material
The Ethical Use Case
There's a clear distinction between ethical recording for learning and problematic recording that professors rightfully worry about.
✅ Ethical and acceptable:
- Recording to create better personal study notes
- Reviewing confusing sections to improve understanding
- Accommodating learning differences or disabilities
- Creating flashcards from lecture content
- Reviewing before exams
⚠️ Gray area (check policy):
- Sharing recordings with absent classmates
- Keeping recordings for future semesters
- Recording when professor prefers you don't (but policy allows)
❌ Unethical and often prohibited:
- Posting recordings publicly online
- Sharing recordings on social media
- Using recordings to criticize or mock professors
- Distributing recordings commercially
- Keeping recordings after being asked to delete them
What Professors Worry About
Understanding instructor concerns helps you address them proactively.
Their teaching being taken out of context: A two-minute clip from a complex hour-long explanation, posted without context, can make anyone look bad. Professors worry about becoming viral memes or having their teaching unfairly criticized.
Copyright and intellectual property: Lecture content, slides, and materials represent significant intellectual work. Professors worry about that work being redistributed without credit or permission.
Student privacy: When students speak in class, they're not consenting to be recorded and potentially shared beyond the class. Professors have responsibility to protect student privacy.
Reduced live engagement: If students can watch recordings later, will they skip live sessions? Will they stop paying attention during class?
How to Address Concerns
When you do ask permission or when professors question your recording method:
Emphasize personal use only: "I'm using this for my personal study notes. I won't share the recordings with anyone."
Mention deletion after course ends: "I'll delete the recordings after finals. I just need them during the semester for studying."
Explain how it helps you engage: "Recording lets me focus on understanding during class instead of frantically transcribing. I pay better attention when I know I can review later."
Show the tool if helpful: For invisible tools like Notigo, you can explain: "It generates study notes from audio but doesn't create sharable video files. It's really just an advanced note-taking tool."
Being transparent and respectful goes a long way. Most professors are supportive of students who genuinely want to learn better.
Common Problems and Solutions
Even with the right tool and proper setup, you'll encounter occasional issues. Here's how to handle the most common problems students face when recording Zoom lectures.
Problem: "My professor disabled recording"
This is the most common issue and the primary reason students seek third-party recording tools.
Solutions:
Use local screen/audio recording: Tools like OBS or Notigo record your local computer output, not the Zoom meeting itself. This bypasses Zoom's recording restrictions because you're technically recording your own screen, not accessing Zoom's recording features.
Ask your professor directly: Explain that you want to record for personal study purposes and won't share the recordings. Many professors are supportive when approached respectfully and understand it's about learning, not avoiding class or sharing content.
Use structured note-taking tools: Instead of fighting the recording restriction, use a tool like Notigo that generates study notes rather than creating video recordings. This sidesteps the "recording" issue entirely while still capturing content effectively.
Check your disability services office: If you have learning differences or any disability, formal recording accommodations might be available regardless of professor preference.
Problem: "Zoom bots keep getting kicked from the call"
If you're using bot-based tools (Otter, Fireflies) and the bot gets removed mid-lecture, you lose everything from that point forward.
Solutions:
Switch to invisible recording methods: OBS and Notigo don't use bots, so there's nothing to kick. Problem solved permanently.
Ask professor to whitelist your bot: Some professors are fine with bots once they understand what they are. Send a quick email: "I use Otter.ai for transcription to help with my notes. It appears as 'Otter.ai' in the participant list. Is it okay if it joins our lectures?"
Use Otter's mobile app for audio-only: Instead of the bot joining, you can record from your phone. You lose some features but maintain basic transcription capability.
Problem: "Recording files are too large"
Hour-long Zoom lectures at high quality can produce 2-3GB files. With multiple courses, this quickly fills your hard drive.
Solutions:
Record at lower resolution: 720p instead of 1080p halves the file size while remaining perfectly readable for lecture content. In OBS, adjust your output resolution in Settings > Video.
Use video compression after recording: Tools like HandBrake (free) can compress video files to 30-50% of their original size with minimal quality loss. Run your recordings through HandBrake before storing them.
Delete after processing into notes: You don't need to keep video files forever. Once you've transformed a recording into study notes and flashcards, the original video is redundant. Delete it.
Use external storage: Get a cheap external hard drive (1TB for ~$50) dedicated to lecture recordings. When your semester ends, archive everything there and free up your main drive.
Switch to audio-only tools: Tools like Notigo don't create video files at all—just text notes. This completely eliminates the storage problem.
Problem: "I can't find specific moments in hour-long videos"
You need to review what the professor said about one specific topic, but it's buried somewhere in a 60-minute recording.
Solutions:
Use transcription tools with timestamps: Otter provides searchable transcripts where you can search for keywords and jump directly to that moment in the recording. Worth using even if you primarily record with another method.
Take timestamp notes during recording: Keep a simple text file open during the lecture. When an important topic starts, jot down the time and topic: "23:45 - enzyme kinetics." Makes finding content later much faster.
Better yet: Use structured note tools: Notigo organizes content by topic automatically, so you don't need to search through time-linear content at all. Just scan the section headings.
Process recordings immediately: The single best solution is not keeping hour-long videos as your study materials. Process them into organized notes within 24 hours, then you're searching text notes, not scrubbing through video.
Problem: "Audio quality is poor"
Choppy audio, echo, background noise, or professor's microphone cutting in and out makes recordings hard to use.
Solutions:
Check your Zoom audio settings: In Zoom, go to Settings > Audio. Enable "Automatically adjust microphone volume." Turn off "Suppress background noise" if it's cutting out too much speech.
Use headphones to eliminate echo: If you're playing Zoom audio through speakers, your microphone picks it up and creates feedback. Headphones solve this completely.
Choose a quiet recording environment: Close the window, turn off fans, ask roommates to keep noise down during your Zoom lectures. Background noise in your environment affects recording quality.
Test different microphones: If your laptop's built-in mic is terrible, a $20-30 USB microphone provides dramatically better audio quality.
Can't fix professor's bad audio: If the problem is on the professor's end (bad internet, poor microphone), there's only so much you can do. Reach out to them or IT to see if they can improve their setup.
Problem: "I forget to start recording"
You realize 20 minutes into the lecture that you never hit record. It's frustrating and means you lose that content.
Solutions:
Set calendar reminders: Calendar alert 5 minutes before each class: "START RECORDING for PSYCH 101."
Make it part of pre-class routine: Checklist approach: Join Zoom → Start recording → Open notes → Ready for class. Build the habit through consistency.
Use auto-join tools: Some tools like Otter can automatically join scheduled Zoom meetings from your calendar. The automation means you can't forget (though you trade this for calendar access and bot visibility).
Forgive yourself and adapt: If you miss recording part of a lecture, take better manual notes for that section. Ask a classmate for their notes. Learn from the mistake but don't dwell on it.
FAQ: Recording Zoom Lectures
Q: Will my professor know I'm recording if I use screen recording software?
A: No. Tools like OBS and Notigo record your local computer screen and audio. They don't interact with Zoom's systems, so there's no recording notification, no indicator light, and no way for other participants to know. You're simply capturing what you see and hear on your own device.
Q: Is it legal to record Zoom lectures without the professor's permission?
A: This depends on your location and university policy. In one-party consent jurisdictions (most of the US), you can generally record conversations you're part of without notifying others. However, university policies often have stricter rules. Always check your school's specific policy. When in doubt, ask permission—most professors say yes when you explain it's for studying.
Q: What if I miss starting the recording?
A: Take detailed manual notes for that lecture as backup. Ask a classmate if they recorded and would share notes (not the full recording). Contact your professor to ask if they recorded and can share it. For future lectures, set calendar reminders 5 minutes before class to start recording. The occasional miss happens—build habits to minimize it.
Q: Can I share recordings with classmates who missed class?
A: This is generally not recommended unless your professor explicitly allows it. Most university policies and professors permit recording for personal educational use only, not redistribution. Better to share your processed notes (which you created) rather than raw recordings (which capture the professor's intellectual property). If a classmate missed class, your study notes are usually just as helpful as a full recording anyway.
Q: Do I need to record every single lecture?
A: No. Strategic recording makes more sense for most students. Record when:
- Topic is particularly complex or fast-paced
- Lots of visual demonstrations you might need to review
- You're feeling tired or distracted and want backup
- Material will be heavily tested
You don't need to record straightforward review sessions or topics you already understand well. Recording everything creates file management burden without proportional benefit.
Q: What's the best format for storing Zoom recordings?
A: MP4 for video (universally compatible, good compression). M4A or MP3 for audio-only. Most recording tools default to MP4, which is fine. If you're using OBS, make sure it's set to MP4 in Settings > Output > Recording Format.
Q: How long should I keep recordings?
A: Keep recordings until you've processed them into study notes and completed the exam covering that material. Once you've aced the test and have the notes, the video is redundant. No need to hoard recordings "just in case." If you're uncomfortable deleting, archive to external storage at semester's end.
Start Recording Your Zoom Lectures the Right Way
If you're ready to find the best solution for recording your Zoom lectures, start with the tool that matches your specific needs:
For most students: Try Notigo for structured, study-ready notes without massive video files.
For discussion-heavy seminars: Consider Otter.ai if speaker identification matters more than invisibility.
For visual-intensive courses: Set up OBS Studio for complete, high-quality screen recording.
The right recording method transforms how you learn from online lectures. Choose tools that support your study workflow, respect privacy, and actually help you understand the material—not just capture it.


